Sorrel Soup

Here is a recipe that will feature in our first Primal Seasons Spring Workshop this October. I’ve found it in Hugh Fearnley-Whittingstall’s fabulous book: The River Cottage Year. It’s in the April chapter.

The sorrel I found in our garden, purposefully planted in the wettest area of our pumpkin patch. So far only the chickens and our sheep were interested in it. That changed tonight when I made this marvelous soup.

Be warned! This is a very filling meal. I had multiplied the recipe to accommodate a dear friend who had joined us for dinner. That was unnecessary, we found out. Hence I changed the “Serves” from 2 to 3.

So here it is:

Primal Seasons Sorrel Soup

Sorrel Soup

★★★★★

Servings: 3 | Difficulty: Easy

Ingredients:

75-100g fresh sorrel, a few good handfuls

50 g butter

1 onion, finely chopped

1 large leek, finely sliced

2 medium carrots, chopped

600 ml good chicken stock

2 T long grain rice, well rinsed

15 ml double cream

salt

pepper

To finish:

3 eggs

15 ml cream

Directions:

Wash the sorrel well and trim off any particularly coarse stalks.

Melt a knob of butter (25 g) in a saucepan over a low heat and add the onion, leek and carrots.

Sweat gently for about 5 minutes, so the vegetables are slightly softened but not coloured.

Add the chicken stock and the long grain rice. Bring to the boil and simmer until the rice is completely tender, about 15 min.

Ladle the soup into a blender, adding the raw sorrel, the remaining butter and the double cream. Blend until completely smooth (depending on the capacity of your blender, you may have to do this in two batches).

Return the soup to the pan, reheat thoroughly without boiling and adjust the seasoning with salt and pepper.

To finish: The perfect poached egg

Poach the eggs one at a time.

Break each egg (which should be at room temperature) into a cup, being careful not to break the yolk.

Bring a small pan of lightly salted water to the boil. When it is boiling rapidly, stir fast with a large spoon to create a vortex.

Pour the egg into the centre of the vortex, place the lid on the pan and turn off the heat. Leave for exactly 2 minutes.

Serve the soup in a warmed bowl with the drained poached egg in the centre and an extra little blob of cream beside it.

Source: The River Cottage Year, p. 94

Enjoy!

Better pictures will follow. Promised!sorrel-soup


Simple Spelt Sourdough Bread

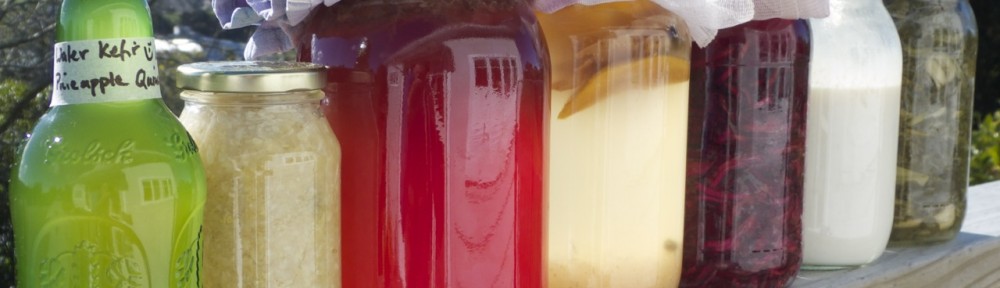
OK ok, you’ve seen several recipes for spreads, jams and curds to put on bread. Here is the very carrier, a simple straight forward Spelt Sourdough bread.

I’ve found the recipe in Andrew Whitley’s book: Bread Matters. A very good book if you feel like getting serious about baking your own traditional breads. After baking rye sourdough breads as described by Sandor Ellix Katz with varying results over the past years, this spelt bread seems to work every single time. The other benefit is the short and simple fermentation process here. Normally the making of rye sourdough bread will take three fermentation steps over up to 24 hours. For a good working 100% rye sourdough bread recipe visit my dear friend and colleague’s, Rani Silva, website!
This easy spelt sourdough recipe here only requires a one step fermentation of 12 hours.

Grain mill
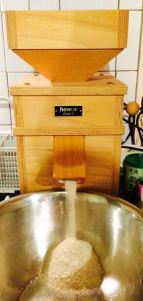
Once you’ve tried this recipe a few times and have bought the above mentioned book, you might consider the purchase of a grain mill. After years of slogging with a hand-operated Jupiter one, I’m now blessed with a Hawo’s Queen 2 electrical mill. Thanks Mum and Santa! 🙂
The difference it makes to have freshly ground flour for baking sourdough bread is tremendous! Apparently, most of the vital nutrients in grains oxidise and break down very shortly after the milling into flour.

Due to the sourdough fermentation the spelt and its gluten seem to be well digestible even by people like my dear wife, Lydia, who is normally very sensitive to gluten.

For this bread you will require a rye flour sourdough starter. Yes: rye. If you don’t have ‘weird’ friends who keep such a pet in their fridge or your house sitter threw your 300 year old sourdough starter out… (like Lydia managed to do once ;-)), make your own!

It should only take you 4-5 days in a warm spot (28-30°C) in your kitchen. A sourdough starter relies on the wild yeasts present on the grains/flour and in your kitchen environment. Each grain (wheat, spelt, rye, rice, barley…) and locality will develop a different sourdough culture, depending on the yeasts present.

Start with 25 g rye wholemeal flour and 50 g of warm (40°C) water. Stir it well. Keep it in a plastic tub with a simple lid that snaps into place or can easily flip open when pressure builds inside.

Each day add 25 g rye flour and 50 g or warm water, stir and return to its warm spot.

On day 4 your starter should start bubbling and taste lightly sour/fruity.rye sourdough starter

You can start using it in recipes now or keep it in the fridge until you need it. Then pull it out to warm to room temperature and add 1/2 cup or rye flour and 1/2 cup of warm water. Stir it well and wait til it starts bubbling again. This can take 8-12 hours. You are now ready to use your starter in a recipe like the one below by Andrew Whitley.

I suggest you double this recipe and bake two breads at a time. These loaves have a tendency to disappear rather fast. Should you have too much, just slice one loaf after a day or two and freeze it for later toasting and use.

Simple Spelt Sourdough Bread

★★★★★

Prep Time: 12 hours | Cook Time: 40 mins | Servings: 1 loaf | Difficulty: Easy

Ingredients:
80 g Rye Sourdough starter

350 g warm water

500 g stoneground wholmeal flour, Spelt

8 g sea salt

50 g seeds, optional (Sunflower-, Pumpkin-, Sesame-, Poppy seeds…)

Directions:
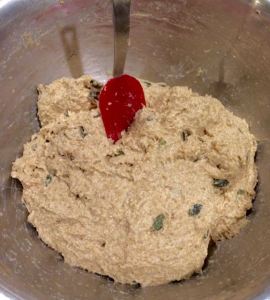
To make the bread, disperse your refreshed rye sourdough starter and salt with a whisk in the water and then mix in the flour and seeds. Knead to develop the gluten and adjust the moisture so that the dough is very soft.

Sourdough

Any structure that you create by tight moulding will largely subside during a long proof, so do not expect a fine-domed top to a loaf such as this.

Dough before rising

Dough in tins before rising

Place the dough in a greased and flour dusted loaf tin, cover it with a loose plastic bag and leave to rise. Do not put the tin in an especially warm place unless you want to hurry the process along. At an average kitchen temperature of about 20°C, this dough should rise in 10-12 hours. In winter I tend to put it onto the cupboard shelf above the crock pot with our continuous bone broth.

Before baking

The risen dough in the tins

Bake in a hot oven at 230°C, reducing the temperature to 200°C after 10 minutes or so. Bake at 200°C for another 30 min for a total baking time of 40 min.

Freshly baked bread

The finished bread

Since all the flour in this loaf has been fermented for a long period, the crumb will be markedly sticky immediately after baking, so it is better to leave it for a day before cutting it. Its keeping quality, however, is remarkable. Even better, the science suggests that a long rise with lactic acid bacteria from the rye sourdough starter and its unique micro-biom will neutralise almost all the phytic acid present in the wholemeal flour bran, making important minerals such as iron, magnesium, calcium and zinc more available to your body than they would be in an ordinary yeasted wholemeal bread.
———————-

So there you have it! Feel free to post your success stories or accidents below!

Best of Success and Bon Apetit!

Spelt Sourdough Bread


Lemon Curd with Honey – a nourishing treat!

Here is another Classic – that had escaped my attention until I came acroos Fergus Henderson’s and Justin Piers Gellatly’s “The Complete Nose To Tail” cook book. A Must-Have, like Julia Child’s books!

Lemons

Being blessed with 15 chooks and a rooster, meaning: a constant supply of fresh eggs, 14 bee hives, abundantly producing lemon and lime trees and a love for good butter, what else to make but Lemon Curd?! It has become a staple in our kitchen.

Here it goes:

Lemon Curd with Honey

Prep Time: 10 mins | Cook Time: 10 mins | Servings: 1 litre

Ingredients:

6 lemons, juice and finely grated zest of,  or limes or 4 oranges
200 g unsalted butter, cut into small cubes
410 g honey
6 large eggs, lightly beaten
1 pinch vanilla powder
1 pinch sea salt

Directions:

Place the lemon juice and zest in a large heatproof bowl with the butter and honey. Set the bowl over a saucepan of simmering water, making sure the water doesn’t touch the base of the bowl. Leave until the butter has melted, stirring occasionally, then whisk in the beaten eggs.

Cook in that bowl for about 10 minutes, whisking every 2-3 minutes, until the lemon curd has thickened. Watch the simmering water to make sure it doesn’t boil rapidly or the eggs will curdle.

Once the curd has thickened, strain it through a fine sieve, then fill into clean jars and seal. It will keep for up to 3 months in the fridge.

Have Fun and Enjoy!!!

Lemon Curd

Pflaumenmus – good old style German plum jam

Plum tree

Ever wondered what magic your grandma was putting into those jars when you were growing up? I have.
…and never really investigated until now. Living on the opposite side of the world now – where people hang upside down – no written records could be found either. Not that I would have been able to read my grandmother’s old German handwriting.

Plums in stone pot

What helped was this marvellous hande-made stone pot, which Babak imports from Iran. Google came to the rescue when my neighbours plum tree was dumping a ton of fruit on the lawn. Add New Zealand plums, a faint memory of childhood Bliss, a ‘googled’ a.k.a. ‘researched’ German recipe, and a Persian stone pot and voila! There it is: A perfect plum jam/Pflaumenmus that comes very close to Grandma/Oma Lieselotte’s magic!

Plums with spices

Just in case you don’t have a Persian stone pot, get one! Haha! Of course, you can probably use your ‘Roemertopf’, still remembering its 1970’s glorious days. A good old (and boring) baking dish with lid will highly likely do the trick too.
You can get these pots in Auckland, NZ, from the Wise Cicada in Newmarket or Farro Fresh.

Plums with sugar

The original recipe was with brown sugar. I took the freedom to replace it with organic coconut sugar. Have also ramped up the variety of spices. The apricot kernels are there for some bitterness. I remember the highlight of my grandmother’s ‘Pflaumenmus’ always was the whole walnut in each jar. They were delicious when you opened them after they had months to marinate in plum aroma.

Baked plums

If you have fresh (mold free) walnuts, make sure to bake them with the plums to sterilise them. Remember to fish them out temporarily while you puree the plums with your hand mixer! Back in they go afterwards.

Baked plums

Here we go:

Pflaumenmus / German Plum Jam

★★★★★
Prep Time: 3 hours | Cook Time: 2 hours | Servings: 3 liters | Difficulty: Easy

Ingredients:

3 kg plums, really ripe
200 g organic golden sugar
300 g organic coconut sugar
2 T cinnamon
5 cloves, ground
10 cardamom seeds, ground
1/4 t vanilla powder
1 star anise, ground
3 apricot kernels, whole (alternatively use 3 whole walnuts)
1 pinch sea salt

Finished plum jam

Directions:

Clean the plums, half them and remove the stones.
Toss the plums with the sugars and ground spices.
Put into a stone pot or baking dish and let sit for 2-3 hours to release some of the juice.
To save time you could also boil the plums with sugar and spices in a pot to realease the juice.
If using a stone pot put it into your oven, leave the lid off the pot, but in the oven, so it warms up too. With your oven set to Baking or Fan Baking start with 120°C for 20 minutes. Increase the temperature every 20 minutes by 20°C (total 60 min) until you reach 180°C. Now put the lid on your pot and bake (no fan) for another 60 min at 180°C.
This will allow your stone pot to heat up evenly without running the risk of cracking. The fan in the first hour will allow a good portion of water to evaporate, which makes for a thicker jam.
At the end of the baking time carefully lift out your hot stone pot. Place it on a heat resistant and stable surface. Now puree the plums with a stick blender into a smooth consistency. Remember to fish out the whole walnuts before blending – if you use that variation!
Fill the jam into hot rinsed canning jars. Turn the closed jars onto their lids and let cool down. Having the jars cool upside down will increase the percentage of properly sealed jars drastically – especially when using recycled ones.
Will keep in your pantry until discovered by your family.

Cooling jars

Now get yourself a slice of freshly toasted rye sourdough bread or grain-free almond bread with a decent LAYER of butter (wait a bit or your butter will drip!) a spoon… I’m sure you get my drift.

Enjoy!

Pflaumenmus

Home made Raspberry Limonade

Raspberry Limonade

The summer is performing at its very best here in New Zealand. Time to brew some refreshing drinks! Yes, beer has been made with freshly harvested stingy nettles earlier this summer, thanks to Amy McComb of Plantrhythms! Want the recipe? Let me know by dropping a comment below!

Back to our low alcoholic treat. I found the inspiration for this one while listening to the audio version of Sandor Ellix Katz’ book: The Art of Fermentation – driving my new pony home to Warkworth from Wellington. 11 hours of fermentation wisdom pouring into my ears while crossing the beautiful North Island of NZ.

German rocket vs...

By the time I got home I was ready for a cool drink and a massage. I’ll leave you to figuring out the details of the massage and provide the recipe for the drink.

This recipe works well year round with organic frozen berries. Any kind of berries will do, as long as they are organically grown. I’ve so far experimented with raspberries, blueberries, blackcurrants, strawberries, acai – all with great results.

Limonade

If you happen to have an abundant supply of fresh berries, you might get away without adding any cultures to start the fermentation process, as there usually are plenty of wild yeasts living on unsprayed berries. I used frozen berries and added the whey from my milk kefir (Vegans beware!), a splash of Kombucha and some Coconut Kefir.

Originally home-made lemonades were made just with whey. Milk Kefir provides a higher percentage of yeast strains that will happily start an alcoholic fermentation, in comparison to for example: Caspian Sea Yoghurt. For any of these cultures, please get in touch with your local Weston A. Price Foundation chapter or drop me a line here. The reasoning with adding more than one starter culture was to get a more vibrant fermentation going fast. In my opinion, it will also provide the limonade with a richer pro-biotic profile.

Be aware that the whey will highly likely introduce some fat to your limonade, specifically if you make your kefir with full fat raw non-homogenised milk, as we do. You can see the that effect in some of the pictures. Whey is the clear liquid separating from the fermented milk solids, see picture below:

Kefir

Yes, you can leave out the kefir whey if you don’t tolerate milk products. In that case I suggest you stick to Kombucha and Coconut Kefir. The coconut kefir that Anita and Terry make in New Zealand (in the same facility that René’s Kombucha is brewed, btw.) is made with the Body Ecology kefir starter. This is a laboratory made dairy-free blend of highly effective pro-biotic cultures.

OK, enough Blurb! If you want to hear more and taste a whole variety of cultured foods and beverages I suggest you check out my Event Calendar, there should be at least one Traditional Cultured Foods demo & degustation class in the pipeline. If not, drop me a line and we’ll see if we can organise one in your area.

Raspberry Limonade

Raspberry Limonade
Makes 3 liters
Ingredients:
250 ml lime juice or lemon juice
1 cup frozen raspberries or other organic berries
20-50 ml whey from kefir
30 ml coconut kefir
30 ml kombucha
1.5 cup coconut sugar
3 l filtered water

Directions:
Stir well in a 3 liter glass jar to dissolve the coconut sugar.
Cover with a cloth and let ferment for 24-48 hours. Stir occasionally.
Filter out the berries and bottle in plastic bottles.
Store in fridge and wait 1-2 days for fizz to build up.
Open carefully.
Enjoy on ice!

Limonade

The plastic bottles are essential!
I know, I know… I’ve made a conscious decision to bottle my Kombucha in glass bottles. Yet plastic bottles allow you to gage the pressure building up inside of them. Glass bottles might explode if not refrigerated! I’m NOT kidding. Be safe! I have had more than one thick-walled glass bottle explode from too much pressure building up inside.
Collect/recycle plastic bottles from a local cafe and then re-use them for your fermented beverage projects!

Have fun and be safe!
PS: Yes, due to the yeasts in the pro-biotic cultures your home-made limonade might have small amounts of natural alcohol in it.

Bone Broth a traditional nourishing food

Now, you might be wondering, isn’t this a vegan raw food blog?!

A bowl of Broth

No, it isn’t. Although I’ve been following that diet for five solid years, from 2001 to 2006, I don’t any longer.

Yes, I still teach raw food classes and a full-on Raw Chef Training. Promoting raw food as a ‘lifestyle’ is just not what I do any longer. I firmly believe however in the empowerment that comes from knowledge and skills in the preparation of great food made from organic ingredients. That includes culinary pleasing raw food – especially raw desserts and snacks AND fermented/cultured foods!.

In my own life, my wife Lydia and I are following more or less the recommendations of the Weston A Price Foundation (caffeine is the exception :-)). In my teaching I strongly support their views on nutrition – from personal experience.

It only took me about two years and several lost teeth to eventually listen to my dear doctor, Damian Wojcik in Kamo, Northland. When he recommended to me to start drinking bone broth to improve the state of my dental health I somehow turned deaf. ‘Only’ two abscessed and a few more pulled teeth later I finally gave in and got myself some beef bones from the Kerikeri Butchery. Imagine a raw food chef: hat pulled down into his face, collar up, frequently looking over his shoulder, tip toeing into a butcher’s door. With hushed voice I asked for beef bones – and got given a shopping bag of bloody animal spare parts. Yes, at no cost! You will find that happen frequently too. Bones are not highly priced items at most butcheries.

Nina Flintstone

To my great surprise, Bone Broth (Stock) made a strong impact on my almost constant sweet cravings and low energy levels. These are things of the past. Many other things have changed since then too. I’m drinking a Raspberry milk shake as I am writing this – made from organic raw milk with raw organic egg  yolks… I guess in that regard, I can still call myself a ‘Raw Foodie’ 😉

Lydia was the one who really got passionate about bone broth in the beginning. She bought a crock pot and made sure it was always filled with hot and nourishing stock – she had been a vegan for 24 years by then!!! Imagine being warm and nurtured and feeling it – from the inside. Nothing does that better than a cup of bone broth with a bit of pickle juice from lacto-fermented brine pickles!

Crock pot

I won’t bore you with all the marvellous properties and benefits of bone broth. You’ll find a truck load of valuable information on the Weston A Price Foundation website or by reading Dr. Natasha Campbell-McBride’s book: Gut and Psychology Syndrome (GAPS).

Before getting into the culinary territory here a quick glance at some logical connections: Upon her struggle with temporary infertility a smart naturopath suggested to our then raw vegan friend: “If you want eggs, eat eggs!” She listened and is now the proud mom of two strong kids!
In a similar fashion, it strikes me as logical to think: “If I want strong bones and joints…” Before committing to painful and expensive surgical procedures on my joints (knees, hips, spine etc.) I personally would consider gelatine rich stock/bone broth an option.

And yes, there is a difference between those vegetarian bullion cubes/powders and real bone broth. Often even the organic versions of these soup powders or pastes have a variety of dubious ingredients that can easily contain or camouflage MSG (like: yeast, hydrolyzed protein, spices…), a chemical you don’t want to add to any person’s diet. I personally stopped using these industrial bone broth substitutes. Try a good miso instead!

And here is the recipe you have been looking for.

BONE BROTH

Yield: Approximately 14 servings. This recipe makes approximately 2-4 liters of broth depending on the size of your crock pot.

Ingredients

  • 4 liter of filtered water
  • 1.5 kg of organic grass-fed beef bones, canon bones/leg bones are best and have plenty of marrow. Ask your butcher to cut them into pieces for you so the fit into your crock pot and you can access the marrow! Organic pasture-fed chicken necks and carcasses are inexpensive and also work great.
  • 2 bay leaves
  • 1 Tbsp of peppercorns
  • 2 Tbsp organic apple cider vinegar, like Bragg’s
  • 1 tsp unrefined sea salt – more or less to taste
  • 2 cloves of fresh garlic or 1 onion cut into quarters, optional
  • 1 whole carrot, optional

Preparation

  1. Brown or roast the bones bones first in a separate pan in the oven. It will caramelize the protein and give your broth a richer flavour. There is usually enough fat on bones to not require extra fat when roasting them. Spread them out on a baking tray and roast at 220°C for 4-5min from one side, turn the bones over and roast for a further 2min from the other side. Make sure NOT to char them!
    Roasted Bones
  2. Place all ingredients in a crock pot and set the heat to HIGH.
  3. Bring the stock to a boil, then reduce the heat setting to LOW.
  4. Allow the stock to cook for a minimum of 8 hours. The longer it cooks, the better (up to 24 hours)!
  5. Strain the stock through a fine mesh metal strainer. Add any meat bits to a soup or eat them as they are.
  6. Place the hot stock into glass jars and seal them for storage in the fridge (for up to a few weeks). Let them cool down on the bench before transferring the jars to your fridge.
  7. The bones can go back into your crock pot for another round – up to 12 times!!! They will release more minerals and gelatine with every round. Just add more apple cider vinegar and sea salt! After a few rounds you might want to add more black pepper corns and a few bay leaves.

You will find that the jars with stock in your fridge turn into a firm jelly. That is caused by the high gelatine content!
If you like, you can skim off any fat that has risen to the top and solidified – consider this “tallow” – and feel free to cook and fry with it or just leave it with your stock for the next soup!

You can drink stock any time of day, before or after meals, or use it as the base for soups and stews! Perfect in any recipe that calls for broth/stock.

Variations

Use any other kind of animal bones you like – chicken, in fact, will take less time due to the smaller pieces. Chicken bones will fall apart after 3-4 rounds.
You can add chopped veggies like carrots, celery and onions for more flavor or variety.
Seaweed, especially Kombu, is a great addition to broth.
For a more smelly, yet gelatine-rich, version a.k.a. fish stock use fish heads! 🙂

For an interesting look at the mineral content of bone broth and the actual mechanism that makes it beneficial for building strong bones and joints have a look at this great article by Kaayla T. Daniel, PhD here!

For an even deeper understanding I suggest you get yourself a copy of “Nourishing Traditions” by Sally Fallon or this little treasure here: ‘Nourishing Broth: An Old-Fashioned Remedy for the Modern World’.

Enjoy and Be Nourished!
René
🙂

Nina cheers!

This is little Nina “Flintstone”. She is living with her dear parents Janaina and Ranieri at http://www.aro-ha.com, where Ranieri is the head chef. 🙂

Liquid Inspiration: Orange Blossom Mead

I’m going to blame this one on Sandor Ellix Katz and his infectious Passion for the realm of fermented food and drink. I have to say, I’ve caught the ‘Bug’! If you think my liquid fermentation experiments started and ended with this recipe here, you are wrong.

Even my beloved wife Lydia is now drinking beer – the herbal home-brewed kind!
While I’m writing this a 20l can of Lemon Balm and Nettle Beer is happily bubbling in our kitchen, see below! Give it a week and then a few more in bottles and our New Years Bubbles will be ready! If you happen to be at Prana on New Years you might be lucky to catch a sample drop of it 🙂

Lemon Balm Nettle Beer

It came to my utter surprise and DELIGHT that one could make beer from any medicinal herb or flower growing around one’s house and garden. The fermentation process actually enhances many of the medicinal properties of plants. For a marvelous introduction to the subject, I urge you to demand this book from Santa: Sacred and Herbal Healing Beers, by Stephen Harrod Buhner.
I’m not talking of the ‘buy-your-cousin-a-beer-making-kit-for-Christmas’ type of beer. These beers, and meads here, do not require hops or any other German purity standards. Simply put, these are sweet herbal teas fermented by beer yeast. Making tea isn’t that hard, is it?! Neither is brewing your own beer!

In basic terms, the difference in making beer or mead is in the choice of sweetener. While I often use organic golden sugar, malt extract or coconut sugar for my herbal beers, it is honey only for meads. For an elaborate exploration of the mead subject I can recommend the reading of: The Compleat Meadmaker, by Ken Schramm. That is advanced reading though, AFTER you’ve made a few batches 😉

One issue I perceive with most people’s perception of fermentation is the fear of getting the ‘wrong’ bugs multiplying and of dying a mysterious death from it. Your chances of having that happen to you are a million times higher in a hospital near you than from your own alcoholic fermentation experiments!
So stick to the simple rule of ‘cleanliness yes! sterility no!’
On that note: I strongly believe in ‘Simple is Best’, so I bought only one packet of beer yeast ever and just keep the yeast sludge from each brew for the next, beer or mead. Over time this will, in my arrogant opinion, accumulate a much stronger variety of yeasts (with wild additions from your home environment) than any store-bought package will ever supply.
You’ll probably get more refined and sublime flavours from your isolated industrial yeasts, yet self-sufficiency has its benefits too 🙂

What is said above, in terms of simplicity, carries through this whole post. Do not get to hung up in the finest details of beer brewing, yeast and temperature control. Rather start playing in this new (actually: ancient!) medium and allow mother nature to guide you. That will come with a few messed up batches. I’d rather risk that than allowing chlorine bleach into our house.

I could wax on about the finer details and different experiences, yet I feel at this point, you are actually ready to get cranking yourself.
So get your hands on some brewing equipment! At a very minimum that should be:

  • a 20l food grade plastic bucket with lid (recycled coconut oil/mayonnaise buckets from your local health food shop/supermarket deli)
  • a 20l food grade plastic jerry can with srew cap and tap (recycled bulk dish soap or vinegar container from your local health food shop. Rinse well and extensively!) This will be your fermenter, see picture above!
  • an air lock or just some cling wrap with a rubber band
  • a bunch of clean recycled wine or juice bottles with screw cap
  • I assume you have a large stainless steel pot or water kettle

Orange Blossoms

This recipe here was inspired by our orange tree going nuts with flowers (the one behind the bottles in the picture across the top of this page). To lighten its load a bit I picked a decent amount of them, juiced some tangelos from the tree behind our house, took the Auckland city honey from Marie-Christine’s bee keeper husband and went ahead. No orange blossoms in your garden or pantry? Leave them out or substitute with anything else, like fresh turmeric, tulsi tea, fennel flowers… get inspired!

And here is your recipe:

Orange Blossom Mead

Ingredients:
360 grams fresh orange blossoms
1.2 liters tangelo or orange juice, freshly squeezed
4 liters raw honey (5.9 kg )
3 tangelos, outer rind only
3 bags of organic black tea
200 ml lime juice
16 liters hot water

Directions:
Put flowers and tangelo rind in a gauze bag. Place together with tangelo juice and honey into a 20 liter bucket.
Add hot water and stir well to dissolve the honey. Keep temperature at or below 70°C!
Now add black tea bags and let cool down. Once cooled to room temperature take out the bags with the flowers and tea and add beer yeast.
Transfer to your 20l jerry can and let ferment at room temperature for 7-10 days. Taste it occasionally!
Once the intense bubbling/fermentation has ceased bottle directly from the tap of your fermenter, without additional sugar in the bottles (this will be a still drink). Let the bottles sit undisturbed in a dark and cool place to have the yeast settle and the mead mature.
Ready to drink right then! Alcohol probably 8-10% or more 🙂
Keep the yeast sediment from your fermenter with some liquid in a 1 liter plastic container in your fridge till you are ready for another batch of beer or mead.

The mead will get more dry and clear as it sits in the bottle. More flavour overtones will develop over the months to come. Store the bottles in a dark and relatively cool place. I have my collection under our house (no frost where we live).
Should you notice considerable pressure building up in your bottles (bulging lids and the odd exploding bottle), put them in your fridge before opening carefully upside down, over a glass in the sink, to catch the foam, and slowly release the content into your glass. Be safe! 😉

DO NOT SHAKE your finished mead bottles! The sediment is yeast and is best left alone.

Enjoy and don’t worry! Have a home brew!

Happy without mead

KimChi – more than pepped-up Sauerkraut!

Here is another stunning fermented vegetable recipe. I am pleased to announce it is purely plant-based, so no fish sauce or other ingredients of dubious origin have been used 🙂

KimChiAt first I was concerned that all the spicy ingredients, which are natural anti-biotics would stunt the fermentation process. And yes, it slows the fermentation down a wee bit but not too much – if you leave it out at room temperature like sauerkraut. The batch in the picture above and to the left was made like  sauerkraut and worked out perfectly.

You have the option though to make the KimChi without adding the spicy chili paste to it initially. Let the vegetable mix ferment in peace first and store the chili paste in a thick-walled glass jar (it might burn holes in any fragile vessel *Twinkle*) Once the fermentation has stopped – after 3-4 days, add the chili paste to taste.
The chili paste can be kept indefinitely in the fridge.

Here comes the recipe. It is the shortened form of a very thorough description I found years ago on this website: www.treelight.com/health/nutrition/UltimateKimchi.html

KimChi
Makes 3-4l of KimChi

Vegetables

  • 1 head cabbage, shredded finely
  • 3 carrots, shredded
  • 2 cucumbers or zucchini, shredded
  • 3 heads broccoli, shredded
  • 1 apple, diced
  • 2 small oranges, juiced
  • 2 t sea salt (more if needed)
  • 1T Apple Cider Vinegar
  • ¼ c Sesame seeds
Chili Paste

  • 3.5 red onions
  • 1 head of garlic
  • 1 small hand ginger
  • 4 soft flesh pieces of preserved lemons, optional
  • 2T Apple Cider Vinegar
  • fresh or frozen chilies, amount according to desired heat
  • ½ t natural sea salt
  • 1T toasted sesame oil, to cover the finished product when storing in a glass jar
  1. Prepare the vegetables by massaging with sea salt like Sauerkraut. Add diced apple, orange juice, sesame seeds and Apple Cider Vinegar and mix well.
  2. Prepare chili paste in a blender and balance flavours. Keep the toasted sesame oil aside for later!
  3. Now mix some of the chili paste with the vegetable mixture and massage with your hands. Test flavour and add more if desired. Keep left over chili paste in a glass jar. Cover top with a layer of toasted sesame oil to prevent oxidization and store in fridge.
  4. This Kimchi can be eaten immediately. Stored in the fridge in a sealed glass jar it will develop a stronger flavour over time and even ferment. Alternatively weigh the top down as when making Sauerkraut (cover top with plastic bag to keep the bugs out!) and leave it sitting in a bowl to catch any bubbling liquids that might escape the jar (see picture below!) on your kitchen counter or in your hot water closet for a week or so. Then take the weight and cover off. Seal the jar with a lid and transfer to fridge.

KimChi bowlAlternatively ferment Kimchi vegetables first, like in the Sauerkraut recipe. After 3-4 days you can add the chili paste and transfer the jar into your fridge.

What else can I say but:
‘Best of Success!’

René
🙂

Wakame Miso Nut Crumble – a perfect salad tune-up!

Another day with the same salad? Healthy snacks nowhere to find?
There is help! If you have a dehydrator or kind-of-modern oven this recipe will brighten your day!

Wakame Miso Nut Crumble
Makes about 4-5 dehydrator trays

  • 400g Almonds, soaked over night
  • 300g Pumpkin seeds, soaked over night
  • 300g Sunflower seeds, soaked over night
  • 300g Sesame seeds, soaked over night
  • ½ c chia seeds
  • 25g dried Wakame sea weed (1 bag), crushed and soaked for 2 hours
  • 3 T Tamari sauce
  • 4 T Brown Rice Miso
  • 1 T Honey or coconut flower nectar
  • 3 cloves of Garlic, minced (Microplane)
  • 2 t natural sea salt
  • ½ t mild chili powder
  • 1 lemon, juice
  • 1 lime, juice
  1. Rinse the soaked nuts and seeds. In a food processor pulse the almonds and pumpkin seeds into a coarse crumbly texture.
  2. Combine everything in a large mixing bowl and stir well. Let it sit for a while for the seaweed and chia seeds to soak up some of the moisture of the mix. That will help sticking things together when dry.
  3. Spread loosely onto Teflex sheets so that enough air can flow through the clusters and the wet mix does not touch the tray above.
  4. Start dehydrating at around 145°F, turn down gradually to 115°F and eventually to 105°F. If you have an Excalibur dehydrator make sure to rotate the trays horizontally from time to time and also rotate from the centre out to the top and bottom rack.
    Should the oven be your only gadget, set the temperature on low: 50°C, turn the fan on, leave the door slightly ajar and go for it! Yes, a few baking trays will do.
    Dehydrate till crisp and completely dry.
  5. Enjoy as crumble over your salads or as individual snack.

Miso Wakame Crumble dry

Miso is one of the few soy-based foods I would actually use. Tamari is the run-off/whey from the Miso production.

Enjoy!
René
🙂

Turmeric, Cauliflower and Carrot Brine Pickles

Have you ever wondered how those delicious pickled cucumbers or vegies were made when you grew up? I certainly did.
If you happen to ask any chef about pickles, they will highly likely start talking about vinegar, sugar etc. The art of preserving and enhancing vegetables with a salt brine, creating a lactic fermentation process is almost forgotten.

Large jar

Thank Heavens and himself for Sandor Ellix Katz’ book: ‘Wild Fermentation’!!! It reconnected me with more than one traditional way of preserving and enhancing food.

These brine pickles have become an absolute staple in our kitchen. And here we go:

Cauliflower and Turmeric Brine Pickle
adapted from Sandor Ellix Katz’ recipe for Sour Pickles
Time frame 1 – 4 weeks
Will make enough to fill a 4.5l jar/crock pot.

  • 2-3 heads of organic cauliflower, cut to small florets, stalks peeled and diced
  • 1kg organic carrots, sliced into thin ‘coins’
  • 500g fresh turmeric.
  • 3-5 heads of garlic, peeled, cloves cut in half
  • ½ t Grape tannin powder (home brewing supply shops). Or a handful fresh grape-, cherry-, oak-, and/or horseradish leaves (if available).
  • 20+ black peppercorns
  • 1T black mustard seeds
  • 4 bay leaves
  • 2 sprigs of curry leaves, optional
  • 6 T sea salt and 2 liters filtered water (keep ratio to 3T salt/liter of water, if more liquid is required!)
  • 2-3 cabbage leaves, outer
  1. Chop cauliflower into small florets. Peel the stems and dice. Using a mandolin, grate/cut Turmeric into small matchsticks.
  2. In a large bowl mix all the vegetables, turmeric and garlic. Keep a few cloves of garlic aside to put on top of the finished crock. Keep cabbage leaves aside.
  3. Dissolve the sea salt (6T/90ml) in 2 liters of water to create a brine solution. Stir until salt is thoroughly dissolved.
    This concentration works well in most applications: 3T sea salt/1 liter water
  4. Clean the crock, then place at the bottom of it some of the mustard seeds, fresh grape leaves and a pinch of black peppercorns.
  5. Place the mixed vegetables in the crock. Disperse some more of the black mustard seeds, bay leaves and black pepper throughout. Finish with the remaining garlic cloves on the top.
  6. Pour brine over the vegetables. Fill the jar/crock almost to the top. Put folded cabbage leaves on the very top of the mix and press down. The cabbage leaves should be partially covered by the brine. Now put lid in place and close the crock/jar.
    Cabbage leaves on top
    The jar in the picture has been fermenting for a week or so. You can see that some of the brine has been forced out by the fermentation. You can top that up with fresh brine (3T sea salt/liter of water)
  7. If the crock pot does not have a tight fitting lid or you are using a traditional Sauerkraut crock pot, place a clean plate over the vegetables  then weigh it down with a jug filled with water or a boiled rock. If the brine doesn’t cover the weighed-down plate, add more brine mixed at the same ratio of just under 1 T sea salt to each cup of water.
  8. Cover the crock with a cloth to keep out dust and flies and store it in a cool place.
  9. Check the crock every day. Skim any mold from the surface, but don’t worry if you can’t get it all. If there’s mold, be sure to rinse the plate and weight. Taste the pickles after a few days.

10. Enjoy the pickles as they continue to ferment. Continue to check the crock/jar every day.

11. Eventually, after one to four weeks (depending on the temperature), the pickles will be fully sour. Continue to enjoy them, moving them to the fridge to slow down fermentation.

The same recipe works to create different colours, e.g. with zucchini (add tannin to keep crisp!!!), beetroot, carrots and garlic. This will be a deep purple pickle! Experiment with greens too! Silver beet pickles beautifully!

Purple Pickles

Feel free to play with other spices too! Ginger, coriander seeds, juniper berries etc.

Cauliflower Turmeric

This one was made at the last Raw Chef Training Level 1 http://wp.me/P1RysK-5F

I find it not necessary to weigh down the top of the pickles etc.. It is usually fine to fill the jar to the top with vegies and brine and then just seal the lid, put the jar into a bowl to ferment – to catch the brine that gets squeezed out during fermentation.

For metal lids I use a double sheet of cling film over the top of the jar before putting on the lid. That prevents the salt brine from corroding the lid.

Pickles

Enjoy your pickles as a side dish, vegetable part of your meal or a yummy snack between meals!

René
🙂

PS: Yes, we’ll make these kind of pickles at the Raw Chef Trainings, Level 1.